Getting Started with Fable Elmish
Mar 5, 2017tldr: Learn Elmish by working up to the Counter sample app from scratch.
Prerequisites
This post assumes that you are already aware what Fable is. Knowledge of Elm might help, but is not required. It’s also assumed that you have the following installed:
- F#: Parts of the Fable compiler are written in F#. The “Use” tab on the fsharp.org site can walk you through F# installation.
- Node.js: Fable takes advantage of the JavaScript Node.js ecosystem.
- Yarn: Yarn is a package manager for Node.js. The fable-elmish project uses Yarn, so that’s what we’ll use to install our tooling and libraries.
The instructions in this post were done on Mac OS X and Ubuntu Linux, but everything should translate easily to your platform/flavor of choice.
We’re going to do everything by hand in order to grok all the moving pieces. Configuration will be kept to a minimum to avoid extra mental overhead.
Getting Started
Let’s start by creating a directory for our project and changing into it:
mkdir elmish-counter && cd $_Next, we’ll set up a package.json for our app. We could run yarn init, which will step you through several configuration prompts, but we’re going to create a minimal file by hand. In the elmish-counter directory, create a file named package.json with the following contents:
{
    "name": "elmish-counter",
    "version": "1.0.0"
}
If you run the yarn command at this point, you should see something like this:
$ yarn
yarn install v0.21.3
info No lockfile found.
warning elmish-counter@1.0.0: No license field
[1/4] 🔍  Resolving packages...
success Nothing to install.
success Saved lockfile.
✨  Done in 0.08s.
If you check the project directory now, you’ll see the following:
node_modules
package.json
yarn.lock
There is one new directory, node_modules, and one new file, yarn.lock.
The node_modules directory is used to store the JavaScript dependencies and tooling for our application. When we use yarn to add a package to our project, it will update the package.json with an entry for each dependency and download the dependencies into the node_modules directory. You do not need to check this directory into source control. Since we haven’t added any dependencies yet, the directory is empty.
The yarn.lock file tracks the exact versions of the dependencies in our project. You should not edit this file by hand: Yarn will update it automatically when we use it to add packages. The lock file should be checked into source control so that others can reproduce the exact build. Since we haven’t added any packages yet, this file is empty save for a warning to not edit it by hand.
Fable
Let’s install our first project dependency: the Fable compiler. We can install it and the Fable core library with Yarn:
yarn add fable-compiler fable-coreThis should generate a lot of output:
yarn add v0.21.3
warning elmish-counter@1.0.0: No license field
[1/4] 🔍  Resolving packages...
[2/4] 🚚  Fetching packages...
[3/4] 🔗  Linking dependencies...
[4/4] 📃  Building fresh packages...
success Saved lockfile.
success Saved 261 new dependencies.
... [snipped a bunch of dependencies]
warning elmish-counter@1.0.0: No license field
✨  Done in 11.10s.
If you look in the node_modules directory, you should see many items now, including the fable-compiler and fable-core directories. Also, the yarn.lock file now contains all of the package dependencies and their exact versions.
With Fable now installed locally, you can run it with the following:
./node_modules/.bin/fablewhich should print something like this to the console:
fable-compiler 0.7.48: Start compilation...
--projFile is empty
If you see this, it means the Fable compiler was successfully installed.
Project Layout and Supporting Files
Let’s create a src directory to hold our F# source and a public directory to hold our deployable files:
mkdir src publicIn the public directory, create an index.html file to host our application:
<!DOCTYPE html>
<html>
  <head>
    <meta charset="utf-8">
    <title>Elmish Counter</title>
  </head>
  <body>
    <div id="app"></div>
    <script src="bundle.js"></script>
  </body>
</html>
Here we have a basic HTML file with 2 key elements:
- a
divwith the id “app” that our single page application will be mounted to. - a
scriptwith a reference to “bundle.js”. This is the file that our F# source will be compiled and bundled to (more on this later).
App.fsx
Now create a file in the src directory named App.fsx. This is an F# script source file that will become our application. For now, let’s start with someting simple we can use to verify our progress. Edit the file to contain the following F# snippet:
printfn "Hello, world!"Let’s use the Fable compiler to compile it to JavaScript and output it to the public directory. Make sure you are in the root directory of the project and run the following:
./node_modules/.bin/fable src/App.fsx --outDir publicIf all went well, you should see something like the following:
fable-compiler 0.7.48: Start compilation...
Compiled App.js at 1:26:53 PM
Fable took our F# App.fsx script file and compiled it to a JavaScript file named App.js in the public directory. Unfortunately, this file is not usable by a browser. If you open it up and take a peek, you’ll see statements like import and export. Our App.js file is importing functionality from other dependencies in the node_modules directory. These module features are currently not yet supported natively by browsers. In order to make App.js usable by a browser, we’ll need to use a “bundler”. A bundler takes a JavaScript source file and the various modules it references and bundles them into one file, stripping away the stuff the browsers don’t understand. We’ll use webpack for this.
In order to get webpack set up, we need to add several packages to our project:
yarn add babel-core babel-loader babel-plugin-transform-runtime babel-runtime source-map-loader webpackWith webpack installed in our node_modules directory, we can use it to bundle App.js and its dependencies:
./node_modules/.bin/webpack --entry ./public/App.js --output-path ./public/ --output-filename bundle.jsHere we’ve told webpack to use the App.js file that Fable generated as our entry source, to put the generated output into the public directory, and to call the resulting output file “bundle.js”.
You should see webpack echo something like the following:
entry "./public/App.js"
Hash: 972b3e1d51c2e259452a
Version: webpack 2.2.1
Time: 296ms
    Asset     Size  Chunks             Chunk Names
bundle.js  67.1 kB       0  [emitted]  null
[0] ./~/fable-core/Date.js 6.19 kB {0} [built]
[1] ./~/fable-core/Util.js 9.37 kB {0} [built]
[2] ./~/fable-core/Long.js 19.1 kB {0} [built]
[3] ./~/fable-core/Symbol.js 699 bytes {0} [built]
[4] ./~/fable-core/String.js 14.9 kB {0} [built]
[5] ./~/fable-core/RegExp.js 3.29 kB {0} [built]
[6] ./~/fable-core/TimeSpan.js 2.16 kB {0} [built]
[7] (webpack)/buildin/global.js 509 bytes {0} [built]
[8] ./public/App.js 108 bytes {0} [built]
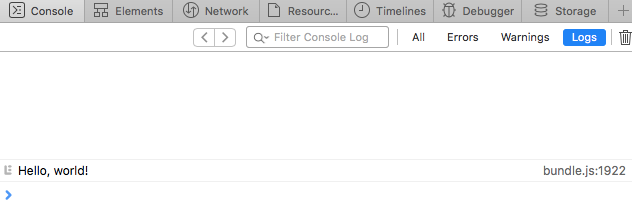
If everything worked, there should be a bundle.js file in the public directory. Remember how our index.html contained a script reference to bundle.js? If you now open the index.html file in a browser and check the console, you should see the “Hello, world!” message we used printfn to emit:
Nice! We can now take F# and turn it into something usable on a web page. World domination is almost within our grasp.
Configuration
Those commands to run Fable and webpack are kinda unwieldy. We can make running them easier with some configuration files. Let’s start with webpack. By default, webpack will look for a file named “webpack.config.js” when it runs. You can put all the options you want it to use in that file instead of passing them every time it runs. Let’s translate the command-line arguments we were using to the config file. Create a webpack.config.js file in the root directory and add the following:
var path = require("path");

module.exports = {
    entry: "./public/App.js",
    output: {
        filename: "bundle.js",
        path: path.resolve(__dirname, "public")
    }
};
Now all we have to do is type ./node_modules/.bin/webpack and webpack will load the config file and do what we were doing by hand before. We can do better than this, though: Fable looks for a config file named “fableconfig.json” for its settings by default when it runs. We can use this to clean up the Fable command as well as kick off webpack. Create a fableconfig.json file in the root directory and add the following to it:
{
    "projFile": "./src/App.fsx",
    "outDir": "./public",
    "scripts": {
        "postbuild": "./node_modules/.bin/webpack"
    }
}
This file tells Fable to use our App.fsx file for the project file, to put the compiled results into the public directory (remember, Fable will call this App.js), then kick off webpack, which will work its bundling magic with App.js and its referenced modules and create bundle.js. Now all we need to do to build everything is:
./node_modules/.bin/fableNote: to keep things simple, only the bare minimum configurations required to get things working were used. Both Fable and webpack have many more configuration options, which you will see when you start looking at other projects.
At this point, the administrivia for creating a build is out of the way and we can focus on our app.
Hello, Elmish!
To get Elmish installed, we need to add more packages:
yarn add react react-dom fable-react fable-elmish fable-elmish-reactLet’s revisit our App.fsx and get something showing in the browser. Change the contents of App.fsx to this:
#r "../node_modules/fable-core/Fable.Core.dll"
#r "../node_modules/fable-react/Fable.React.dll"
#r "../node_modules/fable-elmish/Fable.Elmish.dll"
#r "../node_modules/fable-elmish-react/Fable.Elmish.React.dll"

open Elmish
open Elmish.React
open Fable.Helpers.React

let initialModel () = "Hello, Elmish!"

let update model =
    model

let view model dispatch =
    p [] [unbox model]

Program.mkSimple initialModel update view
|> Program.withReact "app"
|> Program.run
If you run fable again:
./node_modules/.bin/fablethen open/refresh the index.html file in your browser, you should see the “Hello, Elmish!” message directly in the page.
Alright, there’s a lot to go over in our updated App.fsx file, so let’s break it down. There are 4 key ideas to cover.
The first is a model which will hold our app’s state. We’ve created a function initialModel that returns our simple model–a string:
let initialModel () = "Hello, Elmish!"The second idea is the update function. The update function is used to apply any changes we want to make to the model. In our case, we’re not changing anything, just returning the model that was passed in:
let update model =
    model
The third idea is the view function. The view function takes a model and generates a user interface for it:
let view model dispatch =
    p [] [unbox model]
The p function is a React helper that comes from the fable-react library, specifically the Fable.Helpers.React module. The React helper functions are used to create ReactElements that get rendered as HTML. The first argument of a helper function is a list of properties and the second argument is a list of child elements. Here, we’re adding model (the string “Hello, Elmish!”) as a child to our p element. The unbox function is used to cast the string to a ReactElement. For now we are ignoring the dispatch function.
The final idea is the Program pipeline:
Program.mkSimple initialModel update view
|> Program.withReact "app"
|> Program.run
The mkSimple function creates a Program F# record that holds the model, update, and view functions we’ve defined. The withReact function takes the Program record and uses a React renderer to render the view onto our app div. The run function sets up a loop that listens for messages and kicks it off. Each time the loop runs, it calls the update function with the current model, then sends the updated model to the view function for rendering:

We are only going through the loop once since there are no messages generated by our view or externally. If we want to send messages into the program loop, we can use the dispatch function we ignored earlier. Calling it will send a message into the program loop, kicking off another iteration of the module->update->view cycle. To see how this works, let’s implement the Counter sample app.
The Counter
Below is the (slightly modified) source for the Counter sample app in the fable-elmish project. Replace the contents of App.fsx with the following:
#r "../node_modules/fable-core/Fable.Core.dll"
#r "../node_modules/fable-react/Fable.React.dll"
#r "../node_modules/fable-elmish/Fable.Elmish.dll"
#r "../node_modules/fable-elmish-react/Fable.Elmish.React.dll"

open Fable.Core
open Fable.Import
open Elmish

// MODEL

type Msg =
| Increment
| Decrement

let initialModel () = 0

// UPDATE

let update (msg:Msg) model =
    match msg with
    | Increment -> model + 1
    | Decrement -> model - 1

// rendering views with React
module R = Fable.Helpers.React
open Fable.Core.JsInterop
open Fable.Helpers.React.Props

let view model dispatch =
    let onClick msg =
        OnClick <| fun _ -> msg |> dispatch

    R.div []
        [ R.button [ onClick Decrement ] [ unbox "-" ]
          R.div [] [ unbox (string model) ]
          R.button [ onClick Increment ] [ unbox "+" ] ]

open Elmish.React

// App
Program.mkSimple initialModel update view
|> Program.withConsoleTrace
|> Program.withReact "app"
|> Program.run
Now if you run ./node_modules/.bin/fable, then open index.html in your browser, you should see something like the following:

If you click the “-” and “+” buttons, the number in between should update.
Let’s go over the changes. The first thing to notice is the Msg type:
type Msg =
| Increment
| Decrement
These are the 2 kinds of messages we will be sending to our program loop: Increment or Decrement (more on this later).
Let’s move on to the model. The new model is just an integer, and the initial value is 0:
let initialModel () = 0The update function now takes a Msg as well as a model:
let update (msg:Msg) model =
    match msg with
    | Increment -> model + 1
    | Decrement -> model - 1
The msg parameter is of type Msg, which means it will either be Increment or Decrement. The model parameter will be the current value of the model. Assuming our initial model of 0, this means if the update function receives an Increment message, it will add 1 to 0, returning 1 for the updated model. This value will then get passed to the the view function:
module R = Fable.Helpers.React
open Fable.Core.JsInterop
open Fable.Helpers.React.Props

let view model dispatch =
    let onClick msg =
        OnClick <| fun _ -> msg |> dispatch

    R.div []
        [ R.button [ onClick Decrement ] [ unbox "-" ]
          R.div [] [ unbox (string model) ]
          R.button [ onClick Increment ] [ unbox "+" ] ]
Here the Fable.Helpers.React module is assigned to the local module “R”. Later, the React helper functions are called with the “R” prefix. You’ll see this pattern in other applications.
The view function takes the model and a dispatch function, which we’re putting to use with the onClick function.
The onClick function is a little tricky. OnClick is one of many possible cases of DomAttribute that can be used as a property for a ReactElement. The value of the OnClick constructor is a function that takes a React.MouseEvent and returns unit. In this case, the function is a lambda expression that ignores the mouse event and pipes a Msg to the dispatch function. The lambda expression is fed to the OnClick attribute using the backward pipe operator. It could just as easily have been written using parentheses instead of the backward and forward pipe operators:
let onClick msg =
    OnClick (fun _ -> dispatch msg)
If you look at the 2 buttons being created inside the parent div, they both use the onClick function (onClick Decrement and onClick Increment) as a property to their respective ReactElement button. When a user clicks either button, the resulting Msg type will be passed to the dispatch function. The dispatch function will feed the Msg into the program loop causing another iteration of update and view being called. The update function will receive the Msg and change the model accordingly, which will then be sent to the view function which will update the UI.
In between the buttons is our model which is fed to the string conversion function, then unboxed to create a ReactElement that displays the current state of the model.
Finally, we have the Program record and loop:
Program.mkSimple initialModel update view
|> Program.withConsoleTrace
|> Program.withReact "app"
|> Program.run
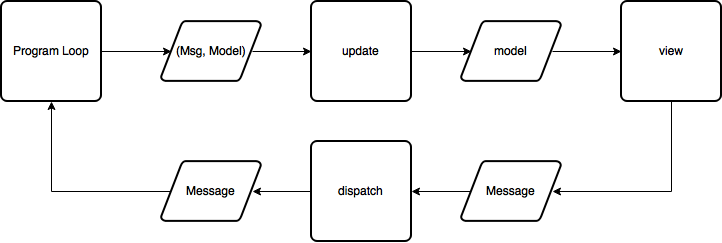
Since we are now using the dispatch function to send messages into the program loop, our application’s flow looks like this:
The only difference between the mkSimple function call from the the one we were doing earlier is that there’s an extra function in the pipeline: withConsoleTrace. Adding this function will cause the model and message of every program loop execution to be printed to the console. In our case, every time we click the “+” or “-” button, the model and an Increment or Decrement Msg will be printed to the console:

And that’s the Counter app.
Hopefully you now have a very basic understanding of Elmish that will make writing your own Elmish apps easier. We have just scratched the surface: there are many more features to explore.
Further reading
- fable-elmish: the reason for this post! Check out the samples to see more advanced usage and configuration settings. Also check out the subprojects elmish-react and elmish-debugger.
- fable-suave-scaffold: this is an ambitious project that combines a full-stack F# solution using Elmish on the frontend and Suave on the backend. It features hot reloading and code sharing between the client and server. This is one to watch.
- Fable Gitter: the Fable Gitter Room is a friendly, helpful place where experienced and new F# frontend folks hang out to chat.
#fsharp #fable #elmish